Followers of my blog

Sunday 20 November 2011

Making resin jewellery

I spent this weekend learning how to make resin jewellery at the London Jewellery school: http://www.londonjewelleryschool.co.uk/resin-and-perspex/resin-jewellery/
The tutor was  Michael Milloy, a catwalk jewellery designer who has worked with Louis Vuitton and Marc Jacobs! http://www.econe.co.uk/designers/michael-milloy.html?limit=all
He was really helpful and informative and helped me finish some pieces off when I was struggling. I would definitely recommend the course.

The first thing we learnt was how to mix the resin with the hardner. We used something called Chemfast, which you mix with hardener at two parts to one. You pour the mixture into a plastic cup and stir with a wooden stick for 4 minutes so that it's thoroughly combined. Then you can add coloured dye if you want or just use a clear resin. There are special molds for making resin jewellery pieces, but you can pour it into other items, such as an ice cube tray or make your own mold from perspex. It's advisable to line the mold with vaseline to make sure the pieces pop out easily. If you mix too much resin it gets really hot, so it's also best not to make too much at once.

There are different types of dyes - liquid and powder. With the liquid dye you only need a drop to create a strong colour.

You can embed all sorts of objects into your resin. Some of the things we had to use in the class were feathers, buttons, sweets, glitter, sequins, paper pictures, plastic models. Michael also suggested you could use items from a dolls house such as little plates and teacups.

The first thing I did was mix up some clear resin for 4 minutes and add then stir in some coloured glitter pieces. I poured this into a mold of nine squares and left it to cure. I then mixed up another lot of resin and added some blue powder dye. The powder dyes give a more shimmery effect than the liquid ones. I poured a little bit into a mold consisting of various shapes (the molds were a bit like ice cube trays), added a button to each shape and poured a bit more in. You can pour up to half way if you want and then once it's set you can add another backing colour. I also added some coloured pieces of glass to one mold and had a go at dropping two coloured resin mixes into a cameo together to make a swirly pattern.

If bubbles appear in your shapes, you can poke them with a cocktail stick, use a blow torch on them or a hairdryer.

We were also shown how to make a mold for a bangle from perspex. You cut two strips of perspex to the required length, sellotape each one into a cylinder, one slightly larger than the other, so that the resin can be poured in between the two. We used a glue gun to make sure the cylinders were in place on a further sheet of perspex. You have to be careful to really seal around the bottom of the mold, or the resin can leak out, as I found later on! You can pour in a colour, wait for it to cure a bit and pour another colour on top, to create stripes, or you could pour lots of colours in at once from different sides.

The pieces were left to cure overnight and the next day we sanded and polished them and then made them into jewellery. This was quite time consuming and difficult, especially as I hadn't used any machinery like this since school CDT lessons. We sanded the edges of our shapes using a stick with sandpaper around it (you must use a face mask when sanding resin). Then, we used a machine that polishes the edges, and finally put them into a cleaning machine - the same affect can be achieved by putting your jewellery into some boiling water with fairy liquid and leaving it to soak.

The bangle was much harder to make, because firstly it was difficult getting it out of the perspex mold and had lots of rough edges and secondly you have to sand over the whole object. I used one of those sanding wheels (I'm sure there is a technical name for them), a file and the polisher. I don't think I could make one of these at home.

At the end we used a special glue (I need to check the name) to attach the findings to the resin pieces. I also made a bracelet which involved drilling holes through some of my pieces. This was quite tricky and the tutor ended up finishing the holes for me! I think it's the best piece I made though!


Here are my finished pieces (excuse the picture quality):

Button cufflinks
Button rings


Multicoloured elastic bracelet (1)

Multicoloured elastic bracelet (2)


Pendant with coloured glass


Gold leaf pendant
Button pendant
Drop dye pendant


Lastly, the most difficult piece!:

Bangle (1)
Bangle (2)


Bangle (3)


Tuesday 27 September 2011

Dragonfly

Here's something I made earlier, inspired by a project in a new book Toby bought for me (Making Beautiful Bead & Wire Jewelry by Linda Jones). It could be used for a hairgrip, brooch, or necklace.


Tuesday 6 September 2011

Red

Today I thought you might like to see a red necklace I made recently using red pearl beads and some red crafty bits I found in Hobbycraft. I made one of the red pearl beads the focal point by wrapping it with some red wire.


Friday 2 September 2011

Resin Jewellery

I'm very excited! After reading an article about resin jewellery and doing a bit of googling I decided to sign up for the London Jewellery School's Resin Jewellery course. You can embed stones, beads, buttons and other objects in resin and add glitter and coloured dyes. It's a type of plastic and is actually quite popular at the moment in jewellery. The course is a two day course and I'm hoping it will open up many possibilities for creativity. I can't wait to get started! I think it will be great to combine resin jewellery with beading. The annoying thing is I have to wait until November to do the course. Have a look at all the pretty things you can make with resin:

http://www.londonjewelleryschool.co.uk/resin-and-perspex/resin-jewellery/


Sunday 31 July 2011

Back and beading

I realised the other day that I hadn't had the chance to make anything for a while, with things being busy at work and moving home, so I decided to sit down and make a couple of things. The first one is a memory wire bracelet. I think I used a medium sized memory wire but it seems pretty big on my wrist.

I've not bought anything for a while but I've discovered there's a Hobbycraft a tram ride away from the new flat so I'll have to go and investigate for more supplies!


I also thought it was about time I organised all my beads and findings, especially as i accidentally jumbled everything up! Rymans sell lots of different boxes and this one has compartments, which are perfect for organising different beads.


Sunday 17 April 2011

De-stressing designs!

Last week at work was particularly stressful so when it finally got to the weekend I had a go at making a few more pieces.  I made the first one for someone as a birthday present. The others are still in progress:


This one was going to be a bracelet but I think it might work better as a necklace so I'm going to add some more chain to it and see. I've used some swarovski crystals in amongst various other beads to add some sparkle:


 This is an almost finished memory wire bracelet using some glass beads and acrylic star shaped beads. It takes a while to thread them all on so I'll finish it off later.


Saturday 9 April 2011

More bracelets!

This weekend is turning out to be quite productive. Since Friday night I have  made some chocolate and cherry muffins (chocolate muffin recipe from the Hummingbird bakery cookbook and is delicious), cooked this yummy greek dish http://www.ocado.com/webshop/recipe/spiced-lamb-steaks-with-lemony-chickpeas/1900?recipeId=1900&selectedCategories=1072%2C1037&, and made this bracelet and earrings for a friend:


During last week I also made this present for another friend (you'll know who you are when you receive it very soon!):


These are two more bracelets I made recently. This one was commissioned by a friend for a mother's day present:

...and this one I made recently after a visit to Hobbycraft, which is expensive but there are soooooo many beads!! I uses memory wire, which always retains its shape:


Sunday 6 March 2011

Assorted necklaces

Here are some necklaces I made recently. This first one is made using glass heart shaped beads, small round glass beads and eyepins.


This one is made using plastic beads and eyepins:


This is another tassle necklace, using glass beads and tigertail beading wire:


Lastly, I posted a picture of a pendant I made a while ago. This necklace was made to suit the pendant:


I also made a bracelet and earrings for a friend using purple star shaped beads and some other assorted ones, but forgot to take a photo of them. I was pleased to hear that when she went out for a meal the waitress asked where she'd got them from!


Sunday 20 February 2011

Charm bracelets

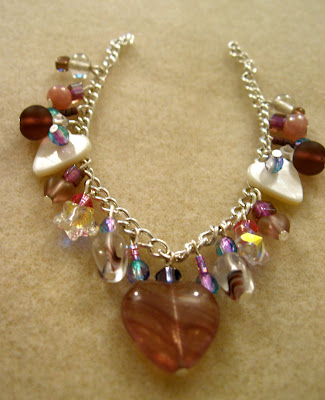
I've been having fun making some charm bracelets. These are both made with a chain and some headpins. The first one was made with glass beads and I did some wire wrapping at the top of the beads. The second bracelet is made with plastic beads from Hobbycraft.


Saturday 12 February 2011

Beginners Beading

Today I went to my Beginners Beading day course at London Jewellery School. It was a fun day where we made bracelets, earrings and necklaces. Some of the things we were taught I'd already had a go at myself, but there were some techniques I didn't know and I'll definitely be trying them out at home. The tutor was really enthusiastic and helpful, so I think I might go back for other courses.

The first thing we made was a bracelet using elastic. This isn't that exciting but I learnt how hide the joining knot inside a bead:


Then we made bracelets using memory wire. This always springs back into shape, a bit like a slinky. I like this technique, although next time I might use less wire to make fewer coils.


From this we moved on to earrings. I've made earrings before but had bought my own ear wires (the bits you put through your ear). We were taught how to make our own ear wires, which is surprisingly simple and you only need to use one set of pliers (the round nosed ones). You need to file the ends of the wire too, otherwise they'll be too sharp to go through your ears:


Lastly, we made necklaces. The first is called an illusion necklace, using a wire called Tigertail. This is a metal wire with a nyclon coating. We also used crimps, which  are tiny beads you squeeze together using crimp tools. They keep your beads in place and crimp covers can also be used at the ends of your jewellery to hide a crimp bead. I made the clasps, using a similar technique to the one you use to make ear wires:


This is a necklace I made with a tassel, also using crimp beads but with nylon wire instead of tiger tail: