Followers of my blog

Saturday, 29 December 2012

Festive gifts

Recently I've been busy making some gifts for friends and family to wear. My mum has always liked pandas so when I found this porcelain panda bead online at The Bead Shop Manchester, I had to buy it: http://www.the-beadshop.co.uk/beads-c491/porcelain-beads-c190/porcelain-animal-bead-4-p1419

I added it to some silver plated chain and combined this with some Swarovski stars and Millefiori hearts and round beads.


All of the beads were attached to the chain with headpins. You can buy these from most jewellery supply shops: http://www.beadsunlimited.co.uk/Headpin-SP/bo4095?sid=2750#item2750. A headpin is basically a thin stick of metal with a flat end at the end to stop beads from falling off. You thread it with beads and then cut above the last bead and create a loop using round nosed pliers. then you can attach them to a chain or an earring finding.

While searching for animal beads I came across these cute ceramic fox beads from Eljo's Habedashery on Folksy: http://folksy.com/items/2549281-3-x-Ceramic-Fox-Beads.


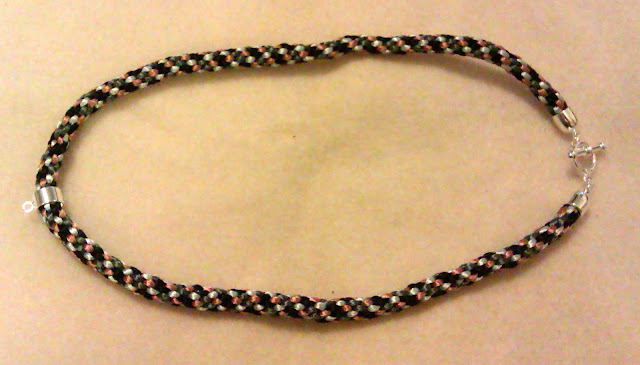
A friend of mine really likes foxes, so I thought some fox based jewellery would be a perfect gift for her. I began by creating some beaded Kumihimo using seed beads. I used colours I thought would tone well with the foxes. I glued the ends of the Kumihimo to some end caps and attached these to a chain.


I then threaded a fox bead onto a headpin with a bead at the bottom, to stop the fox from sliding over the end of the headpin. I attached this to the necklace using some ordinary sewing thread and some glue.


To match the necklace I attached the remaining two fox beads to some earwires using headpins and added beads to match the beads in the necklace.


I also made this necklace and earring set using the same methods as for the fox set. This incorporates a longer stretch of beaded Kumihimo.


Monday, 17 December 2012

Experimenting with beads in resin - what went wrong!

In my last post I showed some pictures of molds I had filled with clear resin and beads. These were using 1 part epoxy resin to 1 part hardener, which is meant to cure fully in 72 hours but soft cure in 24. Well, I kept checking and it just wouldn't harden. In the end a few semi hardened and the rest are a squidgy mess! It's also pretty difficult trying to get them out of the mold.

I had a look around online to try and find out what the problem could have been. According to Craftbits.com it could have been my mold: http://www.craftbits.com/project/basic-resin-casting 

"Latex molds: These are great to use as the flexibility of them means you can literally POP out your resin cast. You may need to experiment with your resin as some resins require a little extra hardener to cure in a latex mold due to the fact that the temperature of the resin is effected because of the latex". Hmmm, maybe I should have added more hardener. 

Some more interesting words from Crafbits.com:

"Mold Release: If you are using a flexible mold there really is not need to add a mold release agent. However a perfect inexpensive release agent is spray cooking oil. Simply give your mold a quick spray and wipe over and it's ready to use". I used Vaseline and it seems a bit sticky and not particularly effective. Next time I will try cooking oil. Failing that, I think I'll buy some mold release.

Other reasons why resin might not cure, can be found here: http://www.resinobsession.com/Resin-FAQ/134/12-reasons-why-your-resin-didnt-cure.html

From these reasons the only things I can think of that would have gone wrong are not adding enough hardener for a latex mold and not having a warm enough room. I did warm the bottles in hot water before using it (specified in the instructions) and the heating was on, but it could have been a reason.

So now I'm left with the difficulty of trying to get the gooey shapes out of the molds and get rid of all the sticky mess. Might just leave that for a bit!
 

Wednesday, 12 December 2012

Experimenting with beads in resin

As I currently have a bit of free time, I thought I'd spend some of it practicing jewellery making techniques in the hope that I can make some things I would be happy to sell. I have just been experimenting with adding beads to resin. I'm still using the Epoxy resin used in previous posts, where you mix one part resin with one part hardener. 

I've already found that some wooden buttons I added keep floating to the surface, but the other beads seem to be staying in place,so I'm looking forward to seeing how they turn out once fully cured. I'm particularly keen to see how the large star (top left in the pictures below) comes out. This is embedded with some multi-coloured Italian Millefiori beads.

This time I have put Vaseline in the molds, which should hopefully make the shapes easier to turn out. Last time I didn't do this and had great difficulty getting them out.


Saturday, 3 November 2012

Beaded Kumihimo

I've been having a go at beaded kumihimo and it's really fun! It takes me ages to prepare the threads with all the beads on the disk but once that's done it's pretty quick to make a bracelet. This is the first one I made and I missed a couple of beads here and there but I was pleased with it as a first attempt:


Then I had a go at a stripy bracelet, using this tutorial as a basis: 
http://www.youtube.com/watch?v=gbB2cfjFXwI
You use the same process as for a non-stripy bracelet but  you have to position the threads in a certain way on the board to create the stripes. I used slightly larger beads for this one, which I think made the bracelet a bit looser than the first one. It's unfinished as I didn't have enough yellow beads.


Finally, I just created this rainbow bracelet, which I'm pretty pleased with. I'm looking forward to making lots more, but they do use up a lot of beads!


Sunday, 16 September 2012

Updates from my blog

Hello lovely people!

You can now follow my blog via email. Just enter your email address in the box on the right hand side of the page and you should receive any blog updates in your inbox.

Angela xx

Sunday, 2 September 2012

Wedding jewellery

I went on the Beginners Tiara Making course at the London Jewellery School today, taught by Gail Florio:

It was fun getting to play with all the Swarovski crystals and pearl beads. We learnt how to measure and make a tiara to fit, how to make and attach fans, trees and flowers, wire twisting, and decorating hair clips and combs. I also learnt a bit more about what you can do with wires of different thickness.

You can use the materials they have in the class and you can also bring along your own components to add to a tiara. The lady next to me was creating a tiara for a family member and had brought along a stunning brooch which was incorporated onto the side of the tiara along with diamantes.

I made a tiara, 2 hair combs, and a couple of hair grips:


Friday, 31 August 2012

First attempt at Kumihimo braiding

I received my beginners Kumihimo braiding kit the other day and have created my first braid, in a surprisingly quick amount of time. Once you start braiding it's actually pretty easy and quick to do. It might take a while before I can make pieces like the one in my previous post, but I can't wait to try it with beads and some nicer colours. The colours of threads in the starter kit weren't really to my liking!

Here is the foam disk with the thread set up for braiding. A cord, or group of cords placed in a notch on the braiding board is called a warp. This project was for an 8 warp braid.


This is part way through. It reminds me of French Knitting:


On completion it looked like this, before fixing the ends:


The kit included some end caps, a toggle and jump rings, as well as some strong glue. You have to tie some thread around the ends before trimming them. Then you can glue them into the end cap:


Now it's just ready for a pendant to be attached:


Wednesday, 22 August 2012

Kumihimo

I'm currently toying with the idea of buying this Kumihimo starter kit: http://www.beadsdirect.co.uk/beadsmith-kumihimo-starter-kit/ST121/

Kumihimo is a Japanese form of braiding and looks like it has so many possibilities. Just take a look at some of these gorgeous bracelets I found that were made using this technique:

Image of Kumihimo Rainbow "Promise" Bracelet Kit - Beads Only
http://www.teenytbg.bigcartel.com/product/kumihimo-rainbow-promise-bracelet-kit-beads-only

http://magpiesroughnuggets.blogspot.co.uk/2011/05/kumihimo-magatama-bead-bracelet-11-0051.html
 
I was considering having a go at Shamballa jewellery but it's everywhere at the moment and I want to do something really different. They look amazing, so I think I'm going to go for it and buy the kit!

Wednesday, 15 August 2012

More starry stuff!


I recently had a go at making these earrings, based on a project in Linda Jones' 'Making beautiful bead and wire jewellery'. The tutorial used different types of beads from the ones I have used here, but the effect is very similar. The hardest bit is getting the hoops to stay round. I still haven't worked this one out but I think maybe they need hammering to make them harder. I suppose not being perfectly round gives them a more handmade look!


Saturday, 9 June 2012

Starry stuff

My lovely husband went to Hobbycraft yesterday and bought me some interesting beads, including little plastic stars. I've mixed them with pearl beads to create some starry earrings:


Sunday, 13 May 2012

Some more bracelets

Had a fun weekend watching Avengers at the cinema and then a day out to Battersea Park followed by a sausage bap with some Pimms. Yum!  Managed to fit in some beading using some charms I ordered from http://www.beadsunlimited.co.uk/.

I made this first bracelet by threading elastic through a chain. It's based on the following project: http://www.beadsunlimited.co.uk/projects/tweeting-birds-bracelet/151
I'm pleased with how it turned out, although my first go at making the elastic chain didn't work so well as it snapped when I tried to tie it together.


The second one has a musical theme:


Monday, 5 March 2012

Beadtastic

Here are a couple of things I made on Sunday. I plan to make the dragonfly into a brooch for my Grandma (It's from a design by Linda Jones in 'Making Beautiful Bead and Wire Jewelry). The other one is a wire wrapping experimentation on one of my resin pieces.


Sunday, 26 February 2012

Resin shapes

So today I learnt lesson number three...use mold release or Vaseline before you pour the mixture into the molds. It was pretty difficult getting the shapes out, but here they are:

Now I have to buy a file to sand the edges and some findings or a pillar drill to make them into jewellery. Or I could put that off and just keep making lots and lots of shapes!

Saturday, 25 February 2012

First attempt at resin

Today I had my first attempt at creating resin shapes at home, using EasyCast resin and PearlEx colour pigments. 

First lesson learnt - buy a plastic sheet. If you have a spillage it's not going to be absorbed by paper and cloths very easily!! Nearly ended up with a bright blue kitchen table.

Second lesson learnt -make sure the bottles of resin and hardner are warm. It turns out if they're not the mixture becomes very cloudy and full of bubbles. This happened with my pink heart shapes.

Here are my shapes. Fingers crossed they'll pop out of the molds when they're hardened.